Continuous Integration/Continuous Deployment (CI/CD) is a software development practice that automates application build, testing, and deployment. By automating the build and deployment processes, CI/CD aims to give developers the ability to deliver new features and updates to users efficiently. CI/CD pipelines often include a set of automatic actions that are carried out whenever code changes are made. These actions include building and testing the code, deploying it to development or production environments, and carrying out additional measures like security and performance testing. By automating these processes, CI/CD enables teams to produce software more quickly and with fewer errors, allowing them to adapt more swiftly to customer and business needs that are constantly changing.
Many tools are available for implementing CI/CD in a software development workflow. Some popular tools include Bamboo, Gitlab CI, AWS CodePipeline, and many more.
Running CI/CD locally offers several advantages for software development teams. One of the main benefits is that it allows developers to catch and fix bugs and errors in their code much earlier in the development cycle. By running tests and deploying locally, developers can quickly and easily identify and address issues before they are committed to the code repository or deployed to a production environment. This tutorial will introduce a technique for implementing CI/CD using Jenkins on a local machine and integrate it with a GitHub repository using Jenkins GitHub WebHooks. After that, we will build a Java application and dockerize it.
Setup Environment
Assuming Java JDK and Maven are already installed in the local environment, the first step is to install Docker in our machine.
Install Docker
Docker is a tool that is used to create, deploy, and run applications in containers. Containers are lightweight, standalone, and portable execution environments that make it easy to package and deploy applications. The Docker engine manages the containers and provides the necessary resources to run them.
In this tutorial, we will use WSL to install Docker on our machine by following these steps:
- Install WSL
- Use Ubuntu 18.04
- Install Docker CE in Ubuntu
Install Jenkins
Next, we will install and run Jenkins from Docker. Pull the Jenkins image from the Docker Hub registry. We can do this by running the following command:
docker pull jenkins
This will download the latest version of the Jenkins image to our machine.
Start a Jenkins container using the Jenkins image that we just downloaded. We can do this by running the following command:
docker run -p 8081:8080 -p 50000:50000 jenkins
This command will start a Jenkins container and bind the container’s port 8081 to the host machine’s port 8080. It will also bind the container’s port 50000 to the host machine’s port 50000.
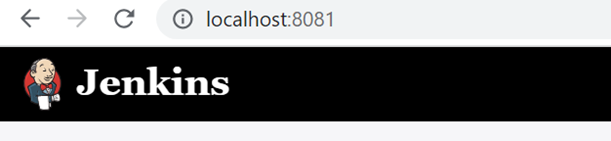
Once the Jenkins container has started, we can access the Jenkins web interface by opening a web browser and navigating to http://localhost:8081.
We can install Jenkins outside the Docker and follow the installation to the Jenkins installation guideline. (https://www.jenkins.io/doc/book/installing/)
Spring Boot application
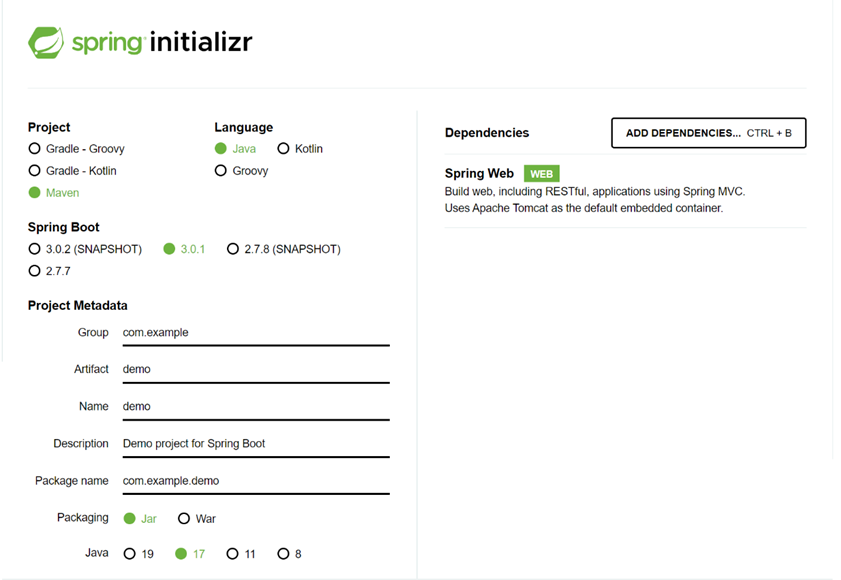
For this demonstration, we are going to use Spring Boot in our project. We can bring our application or create a web project from start.spring.io with the details shown in the image below:
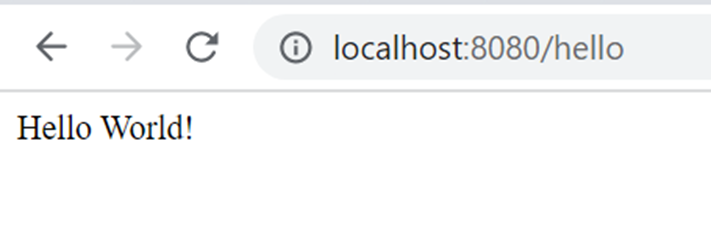
Add a “Hello World” code for checking. Assuming everything goes well, the project can run as expected.
Add some changes, including unit test, then push it to the Github repository.
We are now going to turn this project into a Docker image. Let’s get started!
Building Spring Boot
There are several approaches to building the application as a Docker image:
- Using the integrated Spring Boot build-image goal.
- Using the jib-maven-plugin from Google.
- Using the docker file-maven-plugin from Spotify.
In this case, we will build this application using the jib-maven-plugin from Google. A benefit of using this plugin is that it can run whether or not the Docker is already installed.
To use the jib-maven-plugin in the application, we have to add the dependency in the pom.xml
<plugin>
<groupId>com.google.cloud.tools</groupId>
<artifactId>jib-maven-plugin</artifactId>
<version>3.3.1</version>
</plugin>
Since we have installed Docker on our local machine, we will use mvn compile jib:dockerBuild as the script to build the image and add it to our Jenkins pipeline.
Add Jenkins pipeline
Create a new file named “Jenkinsfile” (we will use this file in the Jenkins configuration later).
See the pipeline script below:
pipeline {
    agent any

    stages {

        stage('Verify') {
            steps {
                bat 'mvn verify'
            }
        }

        stage('Docker Build') {
            steps {
                bat 'mvn compile jib:dockerBuild'
            }
        }
    }
}
We can modify the steps as we desire, such as adding a stage for static analysis checks using SonarQube or deploying the image to the cloud in either the development or production environments. That script is enough since we only plan to run it in this tutorial’s localhost.
In a Maven build, the verify phase is the final phase in the default build lifecycle. It follows the install phase, which installs the built artifacts into the local repository.
The mvn verify command will execute the verify phase and any preceding phases in the build lifecycle (e.g., compile, test, and install).
The command ‘mvn compile jib:dockerBuild’ will build the Docker image using our local Docker installation, as mentioned in the previous section.
Integrating Jenkins GitHub WebHooks
To trigger a build with a GitHub webhook, we will need a Jenkins job that uses a GitHub repository to invoke. In this case, we will create a new pipeline job in Jenkins.
Here are the steps:
- Go to Jenkins (localhost:8081).
- Click new item > Pipeline > OK.
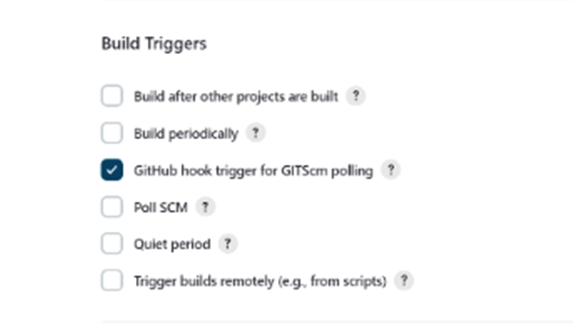
- In the configuration, tick the “GitHub hook trigger for GITScm polling” under Build Triggers.
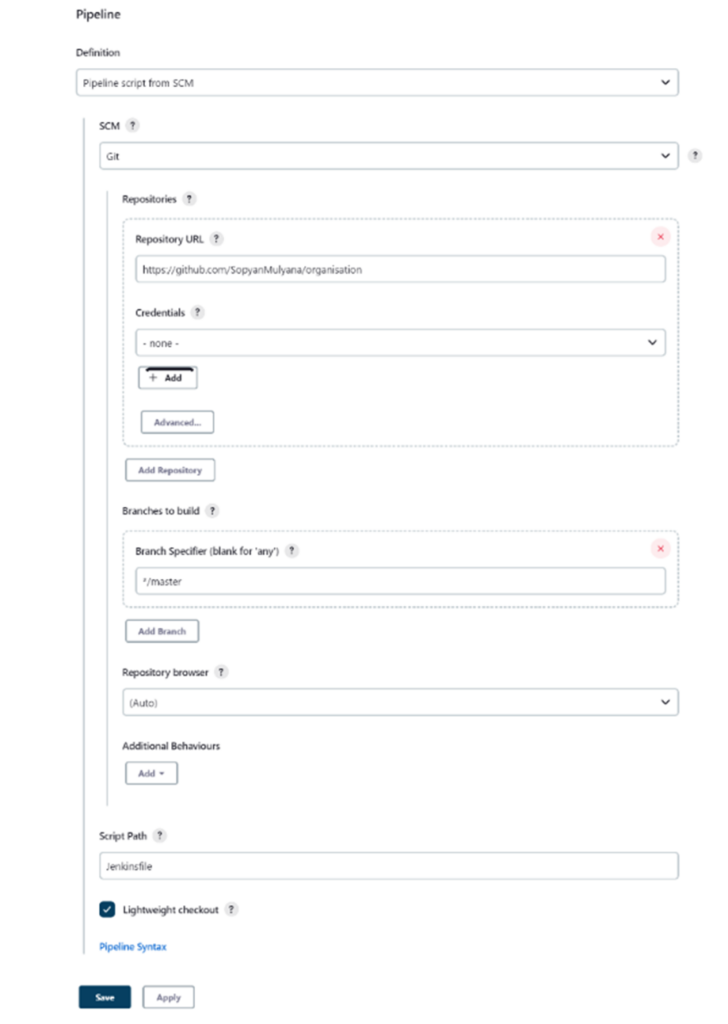
- Scroll to the Pipeline section, select “Pipeline script from SCM,” add our repository link and branch, and put “Jenkinsfile” in the script path field.
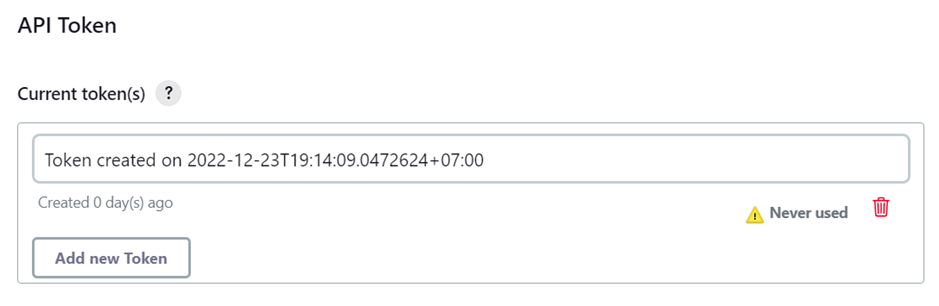
Create Jenkins API Token
In this step, we will need to create a Jenkins token. It will be used as a webhook secret in the Github repository. We can do this by going to the Jenkins admin page, clicking configure, and adding a new token.
Tunneling the localhost
Here is the essential part of Integrating Jenkins locally with the GitHub repository. Since localhost cannot be exposed directly to the internet, we need to expose it to become public using third-party tools. There are several tools for tunneling our localhost, such as Localtunnel or Ngrok.
In this case, we will enable our local Jenkins server to be exposed to the internet using Localtunnel (https://theboroer.github.io/localtunnel-www/)
Install Localtunnel globally (requires NodeJS) to make it accessible everywhere:
npm install -g localtunnel
Use the command line interface below to request a tunnel to our Jenkins local server (port 8081):
lt --port 8081
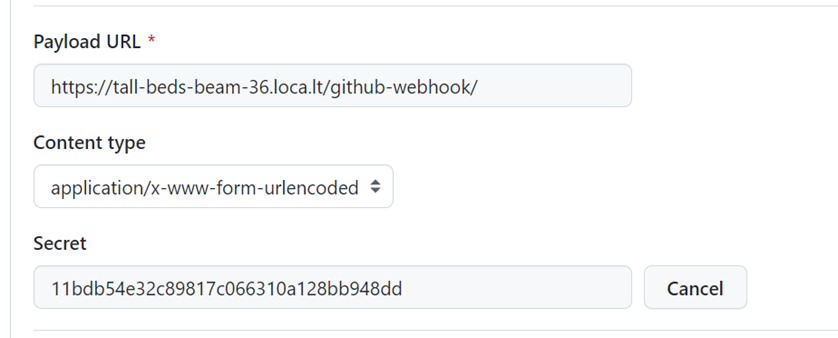
We will receive a URL, for example, https://tall-beds-beam-36.loca.lt
With the Localtunnel URL created and the Jenkins API token copied, simply go to the Webhooks section of the Settings tab of the GitHub repository. Paste in the Jenkins API token as the secret, along with the URL of our Jenkins server with /github-webhook/ appended as a URI.
And that’s it! Now try to push some changes to your repository, then check your Jenkins project.
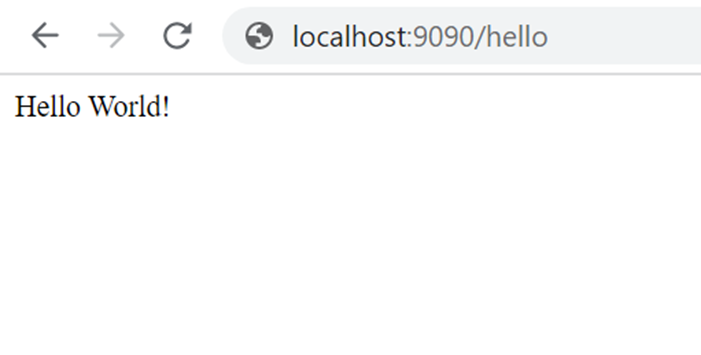
Once it’s done, check the Docker. By default, we can see that Spring Boot creates the image with the artifact ID as the name and the version as the tag. Once built, we can run our new Docker image.
docker run -p 9090:8080 -t demo-application:0.0.1-SNAPSHOT
Conclusion
There are many advantages to using Docker for implementing CI/CD using Jenkins on a local machine. Here are my thoughts:
Since I want most of the configuration of the server to be under version control, this practice offers several benefits, such as providing a historical record of changes to the server configuration, enabling easy racking, and reverting if necessary. It also facilitates collaboration among team members, as they can make changes to the configuration and submit them for review and approval. Additionally, version control allows for better management of different environments.
Secondly, I also want the ability to run the build server locally on my machine when experimenting with new features or configurations. By setting up a local build server, we can test new features, configurations, and changes without affecting the main production environment. This also helps to identify issues early on.
Lastly, I want to easily be able to set up a build server in a new environment (e.g., on a local server or in a cloud environment such as AWS). Setting up a build server in a new environment should be a straightforward and repeatable process. It ensures that the build server can be quickly provisioned and configured in different environments.
Author: Sopyan Mulyana, Software Engineer Analyst Programmer


