by Triyo Ifanto, Analyst Programmer at Mitrais
SharePoint is a great platform for collaboration, and to store content and documents. Any business, regardless of scale, depends on business processes that may include approval processes, notifications, automation or extensions into multiple systems and applications.
To date, creating a workflow in SharePoint required the use of the SharePoint designer, the SharePoint workflow builder or 3rd party tools like Nintex. However, a new Office 365 app called Microsoft Flow promises to help.
Microsoft Flow is a service provided by office 365 suite and is included in most Office 365 subscriptions. Flow is cloud-based, and its automation rules or flows operate along with other cloud-based apps or services. With Flow, it is possible to connect to a large and growing list of services like SharePoint, Dynamic 365, Twitter, MailChimp, Trello etc. Microsoft Flow helps create a workflow for your business process automation that is based on specified actions and logic. Importantly, Microsoft Flow is designed to be friendly to business users, and those not familiar with technical programming can still create their own workflows to increase efficiency.
Amongst the features that make Microsoft Flow a good choice for creating your day-to-day workflows are:
- It is created for business users, so the user interface is designed to be more intuitive.
- There is no need to install any applications on your PC. Flows can be managed using only a browser.
- Flow easily interfaces with other applications and services, either from Microsoft itself or a range of 3rd party services. More connections are being added every day.
- Microsoft and the community are already providing helpful workflow templates, and the number of templates is constantly growing.
- Beside email notification, Flow supports SMS and push notifications for your mobile device.
- By installing Microsoft Flow mobile applications to your mobile phone, you can easily create, manage, and monitor your workflow directly from your mobile device.
To create a Flow, there are three important concepts we need to be familiar with; they are connection, trigger and action. We start by first creating connections. A connection is a service or app that we will be connecting to. Examples might include Outlook, OneDrive, SharePoint, Yammer or Twitter.
Next, we create an event or trigger based on one of those connections. These connections will recognize when these events happen, then take actions. Let’s try an example We’re going to start by making a connection to SharePoint 365, and another connection to Outlook. Our trigger will be that when we add an item into the SharePoint list called Public Holidays, we will have the Flow create a calendar event in Outlook automatically. With no manual intervention and zero code, we’ll be able to automatically create the event on our outlook calendar. This is where we start to see the power of Flow.
Getting started
The first step is free registration on flow.microsoft.com. If you already have the Office 365 suite, you can skip this and launch the app from the Apps launcher on your browser.

What you will get from Microsoft Flow:
– A range of ready to use predefined templates. All you need to do is set a few connections.

– More than 100 popular connections you can work with.

– The ability to explore your Flow in the browser.

– The ability to manage, create & monitor flow activity via Mobile App.

The Relationship between Microsoft Flow and SharePoint
Microsoft flow and SharePoint are part of the Office 365 suite. They are separate but tightly integrated products. Within SharePoint’s List and Document Library, you can start building your flow.

Your first flow
– In the Public Holiday list select Flow, then choose to create a flow. Select “See more templates” on the right panel to go to the template collection page.

– In the template collection page search for “Book a new calendar event after a new SharePoint item is created”.

– Select the template and click the continue button to create the Flow.

– Set the trigger, condition and action for this flow template, then click Save Flow.

– Test the flow by creating a new item on the Public Holiday list.


– You can see that a new calendar event is booked in your Outlook calendar.

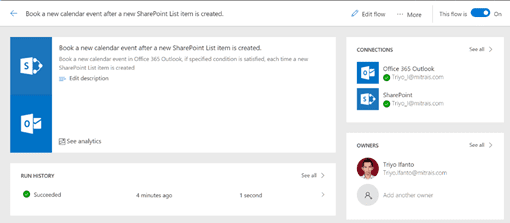
– Check the Flow history, and you see where that Flow succeeded.
Now you know about Microsoft Flow and have successfully created your first Flow, explore your creativity to create a workflow from scratch. Using any of the more than 100 data sources that Microsoft Flow supports, you can make your work more productive and efficient today!